Subscribe
Building a WordPress website often feels more complicated than it actually is. Not because the platform is difficult, but because the process is rarely explained in a clear and structured way. Most guides either skip important steps or overwhelm you with technical details before you even understand the basics.
If you’ve ever tried to figure out how to build a WordPress website and ended up jumping between tutorials, tools, and settings, you’re not alone. This is exactly where many projects slow down or stop entirely.
A proper wordpress website setup is not about knowing everything in advance. It’s about following the right sequence. When each step builds on the previous one, the entire process becomes predictable and much easier to manage.
In this guide, you’ll go through a complete checklist that takes you from the initial idea to a fully launched website. Each stage is explained in a practical way, with clear decisions and no unnecessary complexity, so you always understand what to do next and why it matters.
WordPress Website Setup at a Glance
Before diving into each step, it helps to see the full picture.
A WordPress website is not built in one move. It’s a sequence of decisions that gradually turn an idea into a working system. When you understand that sequence, the process becomes much more manageable, and you avoid the common mistake of doing things in the wrong order.
Quick WordPress Website Setup Checklist
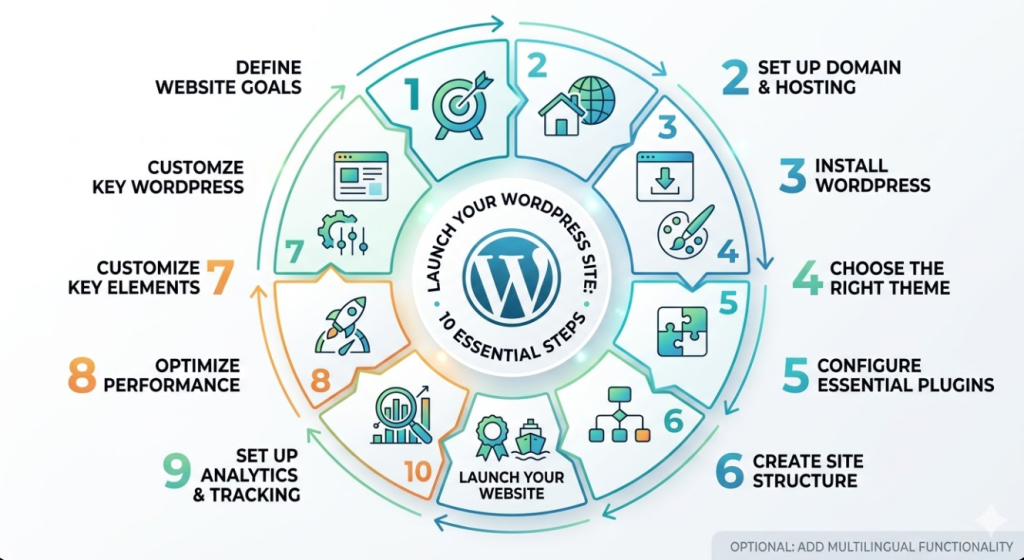
If you want a simple overview before going step by step, here’s the full process in a quick checklist:
- Define your website goals
- Choose a domain name and hosting
- Install WordPress
- Select a theme
- Install essential plugins
- Build your core site structure and pages
- Customize key website elements
- Optimize performance and speed
- Set up analytics and tracking
- Add multilingual functionality if needed
- Launch your website
This checklist gives you a clear picture of how to build a WordPress website without getting lost in details.
It also reflects the structure commonly used in well-organized WordPress website setups.
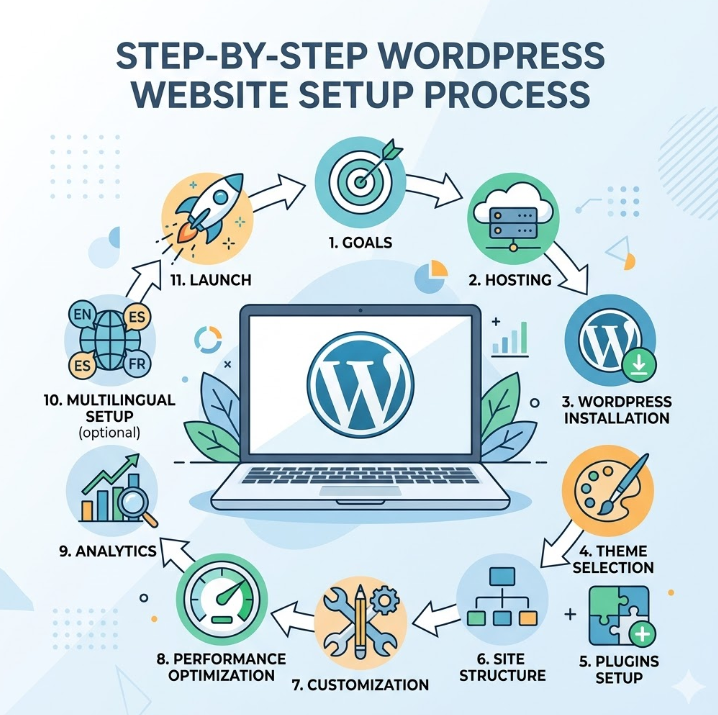
At a high level, every wordpress website setup follows the same path:
Goals → Hosting → WordPress Installation → Theme → Plugins → Structure → Customization → Optimization → Analytics → Multilingual Setup → Launch
This flow may look simple, but each stage plays a specific role. Skipping or rushing one of them usually creates problems later, whether it’s slow performance, poor structure, or limited scalability.
Think of this as your roadmap. In the sections below, we’ll go through each step in detail, so you can build your website with a clear understanding of what comes next and how everything connects.
Step 1: Preparing Your WordPress Website Setup
Before installing WordPress or choosing a design, it’s worth taking a step back and setting a few fundamentals in place. This stage is often underestimated, yet it has a direct impact on how smoothly the rest of your website setup will go.
A well-prepared start removes a lot of friction later. Instead of fixing structural issues halfway through the process, you build on a clear foundation from the beginning.
Defining Your Website’s Purpose
Every website should serve a clear function. Without that, even the best design or tools won’t deliver real results.
Ask yourself what the website is meant to achieve. It could be generating leads, selling products, presenting services, or building authority in a specific niche. Each of these goals leads to different decisions in terms of layout, content, and functionality.
When the purpose is well defined, it becomes easier to prioritize what actually matters and avoid unnecessary complexity.
Choosing a Domain Name
Your domain name is the first point of contact between your website and its visitors. It should be simple, easy to remember, and aligned with your brand or business activity.
Avoid overly long or complicated names. Clarity always works better than creativity in this case. A clean and recognizable domain makes your website more accessible and easier to trust.
Selecting the Right Hosting
Hosting plays a bigger role than many expect. It affects loading speed, stability, and how well your site performs under traffic.
Choosing the cheapest option may seem reasonable at the start, but it often leads to slow performance and limitations as your website grows. A reliable hosting provider gives you a stable environment from day one and reduces technical issues down the line.
If you plan to scale or rely on organic traffic, it’s worth paying attention to performance factors such as server response time and overall reliability, as they directly influence both user experience and search visibility.
How Much Does It Cost to Build a WordPress Website?
The cost of a WordPress website can vary depending on your goals, but here is a realistic breakdown:
- Domain name: $10–15 per year
- Hosting: $3–20 per month
- Theme: Free to $100 (one-time)
- Plugins: Free to $200+ depending on features
In most cases, you can start with a basic setup for under $100, and scale your investment as your website grows.
How Long Does It Take to Build a WordPress Website?
The timeline depends on the complexity of your website:
- Basic website: 1–3 days for a simple setup with ready content
- Standard business website: 1–2 weeks
- Advanced website with custom features: 3–6 weeks
The key factor is not speed, but having a clear structure and process from the beginning.
Step 2: Installing WordPress the Right Way
Once your domain and hosting are in place, the next step is installing WordPress. This is where your website actually begins to take shape, but it’s important to approach it correctly from the start.
Most hosting providers offer a one-click installation. For beginners, this is usually the best option. It’s fast, straightforward, and requires minimal technical knowledge. Within a few minutes, you’ll have a working WordPress environment ready to configure.
There is also a manual installation method, but in most cases, it’s unnecessary unless you have specific technical requirements. The key here is not the method itself, but the quality of the initial setup.
After installation, take a moment to review the basic settings. Make sure your site title, timezone, and permalink structure are configured properly. A clean permalink structure, in particular, helps both usability and search visibility, and it’s much easier to set it correctly now than to fix it later.
At this stage, your goal is not to customize everything immediately, but to ensure that the foundation is stable and logically structured. A well-configured installation saves time in the next steps and prevents avoidable issues as your website grows.
Step 3: Choosing a Theme That Matches Your Goals
After installing WordPress, the next step is choosing a theme. This decision goes beyond visual appearance. A theme defines how your content is structured, how users navigate your site, and how effectively your website supports its purpose.
Many beginners focus only on design. They pick something that looks impressive but doesn’t fit their actual goals. This often leads to unnecessary customization, slower performance, and a confusing user experience.
A better approach is to start from function and work toward design.
Before selecting a theme, consider:
- What type of website you are building (business site, portfolio, blog, landing page)
- How you want users to interact with your content
- Whether you need flexibility for future changes
A good theme should be clean, fast, and easy to customize without relying on heavy modifications. Simplicity usually leads to better results than feature overload.
💡 Tip: A lightweight theme will almost always perform better than a feature-heavy oneIt’s also important to choose a theme that is regularly updated and compatible with modern plugins. This reduces the risk of conflicts and keeps your website stable over time.
If you’re working on a service-based website or consulting project, it’s worth exploring options that are specifically designed for that purpose. For example, you can review Best WordPress Themes for Consultants to see what works in real scenarios.
For conversion-focused pages, such as landing pages or campaigns, specialized themes can make a noticeable difference. A good starting point is Top 10 Best Landing Page Themes That Truly Stand Out, where different approaches are compared.
At this stage, you don’t need to find a “perfect” theme. You need a reliable starting point that aligns with your goals and allows you to move forward without friction.
Step 4: Essential WordPress Plugins You Actually Need
With your theme in place, the next step is extending your website’s functionality. This is where plugins come in.
WordPress plugins allow you to add features without writing code, but this is also where things can quickly go wrong. Installing too many plugins or choosing the wrong ones often leads to slower performance, conflicts, and unnecessary complexity.
⚠️ Common mistake: Installing too many plugins at once often leads to slow performance and conflicts.The goal here is not to install everything you might need, but to focus on what actually supports your website’s purpose.
A good way to approach this is by thinking in categories rather than individual tools.
Performance Plugins
Website speed is not something to fix later. It should be addressed from the beginning.
Performance plugins help you:
- Reduce loading time
- Manage caching
- Optimize how resources are delivered
Even a basic setup can significantly improve how your site performs. If you want a deeper understanding of what impacts speed, this practical guide to boosting your WordPress site speed and improving performance breaks it down in a practical way.
SEO and Analytics Tools
To grow your website, you need visibility and data.
SEO plugins help structure your content, manage metadata, and improve how your pages appear in search results. At the same time, analytics tools give you insight into how users interact with your site.
Without proper tracking, it’s difficult to understand what works and what needs improvement. If you plan to go beyond basic metrics, a step-by-step guide to setting up Google Analytics dashboards in WordPress can give you a much clearer picture of your performance.
Marketing and Conversion Plugins
Once your website is live, the next step is turning visitors into leads or customers.
This is where marketing tools come into play. Depending on your goals, you may need:
- Email capture forms
- Popups or call-to-action elements
- Integration with marketing platforms
Used correctly, these tools can significantly improve conversion rates. For a broader overview, you can explore a practical breakdown of WordPress marketing tools that actually improve conversions and how they support growth.
It’s also worth noting that traditional contact forms are no longer the only effective option. New approaches focus more on interaction and user intent, as explained in why standard contact forms no longer work in 2026.
Security and Maintenance Tools
Security is often overlooked in the early stages, but it should be part of your initial setup.
Basic security plugins help protect your website from common threats, manage access, and monitor suspicious activity. Alongside that, maintenance tools can automate updates and backups, reducing the risk of data loss.
At this stage, your website is starting to become more than just a structure. It’s gaining functionality and preparing for real use.
If you want a curated overview of tools worth considering, Top WordPress Plugins Worth Considering provides a solid starting point without overwhelming you with options.
Each of these categories plays a different role, and together they form the core functionality of your website.
Step 5: Creating the Right Website Structure
Once your core tools are in place, it’s time to organize your website in a way that actually makes sense for visitors.
Structure is often treated as a secondary step, but in reality, it defines how users move through your site and how easily they find what they are looking for. A well-organized structure improves usability, supports SEO, and makes future scaling much easier.
At a basic level, most websites follow a simple and logical hierarchy:
Home
├── About
├── Services
├── Blog
└── Contact
This doesn’t need to be complicated. What matters is clarity. Each page should have a clear role, and navigation should feel intuitive without forcing users to think about where to click next.
When building your structure, keep a few principles in mind:
- Group related content together
- Avoid unnecessary pages that don’t serve a purpose
- Make key information accessible within one or two clicks
- Keep navigation consistent across the site
It’s also important to think about how users will interact with your contact options. Many websites still rely on basic forms that don’t always reflect how people prefer to communicate today. If you want to explore more effective alternatives, this breakdown of why standard contact forms no longer work in 2026 provides useful insights.
A clean structure not only improves user experience but also makes it easier to manage your content as your website grows. Instead of constantly reorganizing pages later, you start with a system that can evolve without friction.
Step 6: Customizing Key Website Elements
At this stage, your website already has structure and functionality. Now it’s time to refine the details that shape how it looks, feels, and behaves in real use.
These elements may seem minor at first, but together they define the overall experience. Small adjustments here can improve usability, strengthen branding, and make your site feel more complete and professional.
Editing the 404 Page
A 404 page appears when a user tries to access a page that doesn’t exist. By default, it’s often generic and unhelpful.
Instead of leaving it as is, you can turn it into a useful touchpoint. A well-designed 404 page can guide users back to relevant content, suggest key pages, or simply keep them engaged rather than losing them entirely.
If you want a practical walkthrough, how to customize a 404 page in WordPress explains how to approach this without overcomplicating the process.
Adding or Changing a Favicon
A favicon is a small detail, but it plays a role in recognition and consistency. It appears in browser tabs, bookmarks, and sometimes in search results.
Adding a favicon helps your website look more polished and makes it easier for users to identify your site among multiple open tabs. It’s a quick adjustment that improves the overall perception of your brand.
You can follow a simple process outlined in how to add or change a favicon in WordPress to set this up correctly.
Working with functions.php Safely
At some point, you may need to customize your website beyond standard settings. The functions.php file allows you to add custom functionality, but it should be handled with care.
Even small errors in this file can break parts of your site. That’s why it’s important to understand what you’re changing and to work in a controlled way, ideally with backups in place.
If you’re not familiar with it yet, a simple guide to editing the functions.php file in WordPress provides a clear starting point and explains how to avoid common mistakes.
These adjustments may not be as visible as design or content, but they help transform your website from a basic setup into something more refined and reliable. Once these elements are in place, you’re ready to focus on performance and optimization.
Step 7: How to Optimize WordPress Website Performance
Performance is one of the most important aspects of a successful WordPress website, yet it’s often addressed too late. Many site owners focus on design and content first, and only think about speed when something starts to feel slow.
⚠️ Important: Fixing performance issues after launch is always harder than setting things up correctly from the start.A better approach is to treat performance as part of the setup process. A fast and stable website improves user experience, increases engagement, and supports better visibility in search results.
At a practical level, performance is influenced by several factors working together:
- Hosting quality
- Caching and resource management
- Page size and media optimization
- Code efficiency
- External scripts and integrations
TTFB → Load Speed → Core Web Vitals → SEO
Ignoring any of these can create bottlenecks that are harder to fix later.
Improving Time to First Byte (TTFB)
TTFB measures how quickly your server responds to a request. It’s one of the first indicators of performance and is heavily influenced by your hosting environment and server configuration.
A slow response time can affect everything that follows, from page loading speed to overall user perception. If you want to understand how to improve this metric, how to improve time to first byte (TTFB) for your WordPress site explains the key factors in a clear and practical way.
Fixing Core Web Vitals
Core Web Vitals focus on how users experience your website, including loading speed, visual stability, and interactivity.
These metrics are not just technical benchmarks. They reflect how comfortable your site feels to real users. Improving them can lead to better engagement and stronger search performance.
For a deeper breakdown, the ultimate guide to Google Core Web Vitals for WordPress covers what to look for and how to address common issues.
Speed Optimization Basics
Speed optimization is not about one single fix. It’s about a combination of improvements that work together.
This includes reducing unnecessary scripts, optimizing images, and making sure your theme and plugins are not adding extra load. Even small adjustments can have a noticeable impact when combined.
If you want a practical starting point, boost your WordPress site speed: a simple guide outlines the most effective actions without unnecessary complexity.
Clearing Cache Issues
Caching improves performance by reducing the need to load resources repeatedly, but it can also create confusion when changes don’t appear immediately.
Understanding how caching works and how to clear it properly is essential, especially during development and updates. Without this, you may think something is broken when it’s simply a cached version being displayed.
For a quick reference, how to clear WordPress cache when your changes don’t show up explains how to handle this in different scenarios.
When performance is handled early, your website becomes easier to manage and more reliable as it grows. Instead of fixing issues later, you build on a foundation that is already optimized for speed and stability.
Step 8: Setting Up Analytics and Tracking
Once your website is functional and optimized, the next step is understanding how it performs in real conditions.
Without analytics, you are essentially guessing. You don’t know where your visitors come from, how they interact with your pages, or where they drop off. This makes it difficult to improve your website in a meaningful way.
Setting up tracking early allows you to build decisions on actual data rather than assumptions.
At a basic level, you should have:
- Traffic tracking (where users come from)
- Behavior tracking (what they do on your site)
- Conversion tracking (what actions they complete)
Google Analytics remains one of the most widely used tools for this. It provides a solid overview of user behavior and helps you identify patterns that are not immediately visible.
However, simply installing it is not enough. Raw data can be overwhelming if it’s not structured properly. That’s why it’s useful to organize your insights into clear views that focus on what matters for your website.
If you want to go beyond the default setup, creating Google Analytics dashboards in WordPress can help you track key metrics more efficiently and keep your data actionable.
At this stage, the goal is not deep analysis, but visibility. You want to understand how your website is being used so you can make informed improvements as it grows.
Step 9: Making Your Website Multilingual (If Needed)
If your audience is not limited to a single language, this is the stage where you start thinking beyond one market.
A multilingual website is not just about translation. It’s about making your content accessible, relevant, and discoverable for users in different regions. When done correctly, it can significantly expand your reach and open new growth opportunities.
At the same time, this step should be approached carefully. Poorly implemented multilingual setups can create SEO issues, duplicate content, and a confusing user experience.
A few key points to consider:
- Decide which languages actually make sense for your audience
- Keep structure consistent across all versions
- Make sure navigation between languages is clear and intuitive
- Avoid automatic translations without review
From a technical perspective, WordPress offers several ways to manage multilingual content, usually through dedicated plugins. The choice depends on how complex your website is and how many languages you plan to support.
If you want a detailed walkthrough, the ultimate guide to creating a multilingual WordPress website explains different approaches and what to consider before implementation.
It’s also important to think beyond translation and look at the broader strategy. Content, messaging, and even keywords may differ from one market to another. This is where a multilingual marketing strategy becomes relevant, helping you scale your website in a structured and sustainable way.
You don’t need to implement this step immediately if your focus is local. But if growth is part of your plan, it’s worth setting up your website in a way that can support multiple languages without major changes later.
| Step | What to Do | Why It Matters |
|---|---|---|
| Goals | Define your website goals | It helps you make the right decisions from the start |
| Hosting | Choose a reliable hosting provider | It affects your website’s speed, uptime, and overall stability |
| WordPress | Install and configure WordPress properly | It creates a stable foundation for the rest of your setup |
| Theme | Select a lightweight, well-coded theme | It improves user experience and helps maintain better performance |
| Plugins | Install only the essential plugins | It reduces the risk of conflicts, security issues, and slowdowns |
| Structure | Organize your key pages clearly | It makes navigation easier and improves usability |
| Customization | Refine important site elements | It improves branding, clarity, and overall user experience |
| Performance | Optimize your website’s speed | It supports better SEO and a smoother user experience |
| Analytics | Set up tracking and analytics tools | It helps you make informed, data-driven decisions |
| Multilingual | Add multilingual functionality if needed | It helps you reach a wider audience and scale across different markets |
| Launch | Run final checks before going live | It helps prevent critical errors after launch |
Step 10: Preparing Your Website for Launch
At this point, your website is built, structured, and functional. Before making it public, it’s important to run through a final check to make sure everything works as expected.
Launching too early without proper review can lead to avoidable issues, from broken pages to missed SEO basics. A short but focused pre-launch process helps you avoid these problems and ensures that your website starts on the right footing.
Here is a practical checklist to go through before going live:
- Check page loading speed across key pages
- Test your website on mobile devices and different screen sizes
- Review navigation and make sure all links are working correctly
- Confirm that all essential pages are complete and up to date
- Set up basic SEO elements such as titles and meta descriptions
- Connect and verify your analytics tracking
- Test forms, interactions, and conversion points
- Ensure images and media are properly optimized
If your website involves moving from an old domain or replacing an existing site, redirects become especially important. Without them, you risk losing traffic and creating broken links. A step-by-step approach to adding 301 redirects in WordPress via htaccess can help you handle this correctly.
Similarly, if you are transferring your website to a new domain or environment, following a structured process is essential to avoid SEO losses. This is covered in detail in how to migrate a WordPress website to a new domain without losing SEO.
Taking the time to review these elements may feel like a small delay, but it prevents larger issues after launch. Once everything is in place, you can confidently make your website live knowing that it is ready for real users.
Common Mistakes When Building a WordPress Website
Even with a clear process, there are a few common mistakes that tend to repeat across different projects. Most of them are not critical on their own, but together they can slow down progress and affect the overall quality of your website.
Being aware of these issues early helps you avoid unnecessary corrections later.
One of the most frequent problems is starting without a clear structure. When pages are created without a defined purpose, the website quickly becomes difficult to navigate and harder to scale. Fixing structure after content is already published usually takes more time than planning it from the beginning.
Another common mistake is installing too many plugins. It often happens with good intentions, trying to add more features or improve functionality. In practice, it can lead to slower performance, compatibility issues, and a more complex setup that is harder to maintain.
Design is another area where things can go off track. Focusing too much on visual details at an early stage often delays more important work, such as content, structure, and performance. A clean and functional design almost always works better than an overloaded layout.
Performance is also frequently underestimated. Many websites are launched without proper optimization, which affects loading speed and user experience from the start. Addressing these issues later is possible, but it usually requires more effort than doing it correctly during setup.
Finally, one of the most overlooked aspects is testing before launch. Skipping final checks can result in broken links, non-functional forms, or inconsistent behavior across devices. These issues may seem small, but they directly impact how users perceive your website.
If you want a more detailed breakdown, Top 10 Mistakes to Avoid When Building a New Website on WordPress explores these points with practical examples and solutions.
Avoiding these mistakes does not require advanced knowledge. It simply comes down to following a structured approach and paying attention to the fundamentals at each step.
From Setup to Scale: When It Makes Sense to Get Expert Support
By this stage, it becomes clear that building a WordPress website is less about technical difficulty and more about following the right sequence.
At the same time, the setup process is only one part of the bigger picture.
Decisions made at the beginning affect how your website performs later. Structure influences SEO. Hosting impacts speed. Plugins affect stability. Small details that seem optional at first can turn into limitations when your website starts to grow.
This is usually the point where things become more complex.
You may start with a simple setup, but then questions appear:
- How do you improve performance beyond basic optimization?
- How do you scale content without breaking structure?
- How do you connect marketing tools in a way that actually drives results?
- How do you avoid technical issues when making changes later?
These are not issues that show up immediately, but they become relevant as soon as your website moves from setup to real use.
This is also where experience starts to matter.
If you want to avoid common mistakes and build a WordPress website that is ready to scale, working with a team like CoDiCo can save you significant time and effort. Structure, performance, and marketing are considered together from the beginning, which helps avoid many of the limitations that appear later.
Whether you build your website yourself or decide to involve specialists, the most important thing is to move forward with clarity. A well-planned setup gives you that foundation, and everything you build on top of it becomes easier to manage.
Frequently Asked Questions
How long does it take to build a WordPress website?
The timeline depends on the complexity of your website. A simple setup with a basic structure can be completed within a few days, while more advanced projects that include custom design, integrations, or multilingual functionality may take several weeks. What matters most is not speed, but having a clear structure from the start.
Do I need coding skills to build a WordPress website?
No, most WordPress websites can be built without coding. Themes and plugins provide enough flexibility for typical use cases. However, understanding basic concepts such as structure, performance, and content organization makes the process much smoother and helps avoid common issues.
What pages should a new WordPress website include?
At a minimum, a website should include:
- Home
- About
- Services or Products
- Contact
Depending on your goals, you may also add a blog, landing pages, or dedicated conversion pages. The exact structure should reflect what your website is designed to achieve.
What should I check before launching a WordPress website?
Before launch, it’s important to review:
- Page speed and performance
- Mobile responsiveness
- Navigation and internal links
- SEO basics such as titles and meta descriptions
- Analytics tracking
- Forms and user interactions
A short checklist at this stage helps prevent issues after the site goes live.
How can I improve my WordPress website after launch?
Improvement comes from continuous adjustments rather than one-time changes. Focus on analyzing user behavior, updating content, improving performance, and refining your structure over time. Small, consistent updates usually lead to better results than large, infrequent changes.