















Полное руководство по CodiCo (2026)
Пошаговый обзор всей платформы — от первых настроек до ежедневной диспетчерской работы: зоны, цены, компании, водители, аэропорты, назначение заказов и партнёры.
Что вы увидите в этом видео
Нажмите на отметку времени, чтобы воспроизвести видео с этого момента.
Расшифровка видео
0:04Hello, this video is a practical guide to using the CodiCo system. Step by step, we will walk you through the key tools you need to manage bookings, pricing, zones, drivers, invoices, and your entire company. The first thing you need to do to enable full system functionality is to go to the settings section and open the general tab. Fill in the basic information about your company and your contact details. It is also very important to enter your Google API keys because without them the system will not work properly and customers will not be able to place orders. For the correct operation of the notification system and email campaigns, you should also enter your SMTP settings. If you do not have your own SMTP, you can leave these fields empty and the system will use the free SMTP provided by CodiCo.
1:02Next, still in the general section, open the booking tab and specify the time limits for how far in advance customers can create, cancel, or modify bookings along with the other global system settings. The zones section defines the locations where your company will operate. Since we previously set up the Google API keys, this setting is now available. Zones is one of the most important sections in the system. Here the system administrator can create divisions, add new zones, divide countries into cities, and more. Later, these divisions and zones are used for setting special prices, calculating order costs, and defining the areas in which the company operates.
1:54By default, the system comes with predefined zones and countries. If you don’t need these zones or countries, you can easily remove them at any time. The system divides zones into two types. Working areas define global zones, divisions for providing services in a single country or multiple countries. If you have several companies operating there, we strongly recommend creating a separate division for each country rather than combining multiple countries into one division or using an entire continent as a single division so that the fair system works correctly for your company or multiple companies. zones. Fixed pricing provides more detailed zone settings for a country. Essentially, the country you created is broken into smaller areas so you can work with them and set special prices from one zone to another.
2:54These settings can later be applied to vehicles in the vehicle classes section. If you need a detailed setup for your company, you can do it in just a few clicks. Click the create shape icon. Select the desired zone and save it by clicking the save icon. Give the zone a name and it will appear in the list of other zones. Be careful and attentive when creating zones as they directly affect system operation. For companies expanding into new regions, there is a special feature called new zone to zone. With it, your partners can set their own prices for service zones, ignoring the prices set by the system admin. This is useful if you don’t yet know the prices in a new region, but already have partners there.
3:49To enable this, click the new method checkbox when adding or editing a zone. Before adding your company, make sure you have selected the correct division for providing services. Click this button, open the drop-own list, and select your country. It is important to note that you can operate in multiple divisions if needed, even if you selected a specific one during the initial system setup. Add your company as well as the company you work with. Click add new and fill in the required information, contact details, upload the logo and specify which services the company provides, transfers, city taxi or delivery.
4:36In this section, enable the notifications you need by selecting the appropriate checkboxes. Also, from here, you can set the division your company operates in and define the transportation service areas. If you provide multiple services, you can set priority for airport transfers, deliveries, or taxi services using these checkboxes, such as city taxi priority. It is important to note that a company will not be able to accept taxi or delivery orders unless its service area is selected on the map. The same applies to airport transfers. You must specify which airports you operate in. A company will also not be able to accept orders unless at least one driver is assigned to it, which we will do later in the driver section. For now, let’s move on to an important section for financial management, commissions.
5:35Commissions is a very important section for controlling financial settlements between companies. When you assign your orders to partners, the system automatically tracks everything and stores all settlements in this section. The system generates a commission invoice once a month, but you can also request an invoice manually at any time. This system keeps track of who owes whom a specific amount of money and the invoice is issued either to the partner or to the system admin. If all payments are made by card and all money is with the system admin, then the admin must pay the partner. There is also a safeguard against non-payment. For example, if your partner does not pay the issued commission, they will not be able to take new orders until the full commission amount is paid. This is designed for your convenience and to protect against third parties. If you want to disable this feature, go to the company settings section and switch off the allow with debt option.
6:38After creating your company, you need to add drivers in this section because without them, the system will not be able to receive or process orders from customers. [clears throat] To do this, click add new and fill in the required fields and the details of the driver you want to add. Later, you can assign drivers manually to orders or allow the system to assign them automatically based on their region, status, and payment methods. If your drivers are not assigned to specific vehicles, simply enter an asterisk in the relevant fields slightly below by clicking see all reviews. You can also view the feedback left by customers for each driver. After adding drivers, go to the vehicle classes section. Add a new vehicle by clicking add new or configure an existing one. This section is used for detailed fair settings for vehicles from additional services to pricing based on distance, zone, time, and types of transportation such as taxi, transfer, or delivery.
7:46Each type of transportation has its own corresponding fair settings. Then fill in the details for the specific vehicle class and set fairs using the flexible system according to the required classes. Slightly below is the zonetozone button for detailed fair configuration. This is one of the most important settings as it directly affects the calculation and cost of trips. It allows you to set special prices for specific routes, districts or zones. With this setting, you can define special prices for certain areas which take priority over the base fairs. When a trip starts in one of these designated zones, the trip cost will be calculated based on these special prices. For detailed information on this setup, refer to the CodiCo dispatch system features overview video.
8:43If you provide airport transfer services, you must add the airports where you operate. Create the airport you need by clicking add new. Enter the airport name, the meeting point, its position in the airport table, and most importantly, the address of the airport. It is also important to note that later in the company section, you must select the airports you created in order to receive orders. In this section, we will take a closer look at everything as this is a crucial stage for the operation of the entire system. After you start receiving new orders, they will appear in the pending tab. The system has two order assignment modes.
9:28Manual, where the admin assigns the order manually. Automatic, where the system assigns orders using AI. To enable this mode, go to settings, booking, and activate the auto assign to companies checkbox. Now, let’s take a closer look at the manual order assignment process. The pending section displays all orders that have entered the system, but have not yet been assigned to a transport company. This section allows the administrator to respond quickly to new requests and distribute them among companies, which is especially important when the system is operating in manual mode. An order can only be assigned to a company that meets the requirements for the vehicle class, available drivers, service zones, and airport transfer availability.
10:15Once a company is assigned, the order moves to the assigned section, but it has not yet been accepted. This section contains orders that are already assigned to a company but have not yet been confirmed. In other words, the company has not yet confirmed its readiness to complete the order. If the company does not confirm or rejects the order, it is returned to the pending section. When the AI assistant is enabled, the system automatically reassigns such orders to another company. If all companies reject the order for various reasons such as no available vehicles or no drivers available at that time, the order is moved to the rejected section. [clears throat] In this case, you will receive a rejection email and the administrator must decide whether to cancel the order or assign it to another company manually. When AI is enabled, the system will automatically display companies that can take the order, saving you time. Once a company accepts the order, it moves to the job section, meaning the order has been accepted, a company has been assigned, and a driver has been allocated.
11:23Only after this step does the client receive a confirmation email with the trip details. If the client cancels the trip for any reason, the order moves to the canceled section. All canceled orders are stored and archived in this section. An order can be cancelled either by the client or by the administrator. Now let’s briefly go through the remaining tabs. Unpaid. This section displays all orders for which payment has not been completed. These may include regular orders where the client did not finish the payment process as well as affiliate partner orders where all orders for the month are combined into a single invoice. City taxi. A list of city taxi orders, also displayed in the pending and assigned sections, sorted by taxi transportation.
12:11Delivery, similar to the city taxi tab, but contains only delivery orders. Requested quote. This section displays all requests for trip cost calculations. Shared transfer. Here you can see all taxi orders where clients agreed to share the trip with another passenger in order to receive a discount. Blocked orders that were not completed due to the company’s fault and require compensation are placed in this section. The administrator determines whether the company is at fault. If the company is found responsible, penalties may be applied, including restricted access to new orders, and the specified amount will be deducted from its total earnings. The export button allows the administrator to download all bookings in CSV format. There is also a separate button for creating a new booking form. When clicked, the administrator is redirected to a new page where a new order can be created manually and assigned to a specific client. Finally, let’s cover a few important details about roundtrip bookings. When viewing an order with a return trip, a button called edit return booking appears in the top left corner. After clicking it,
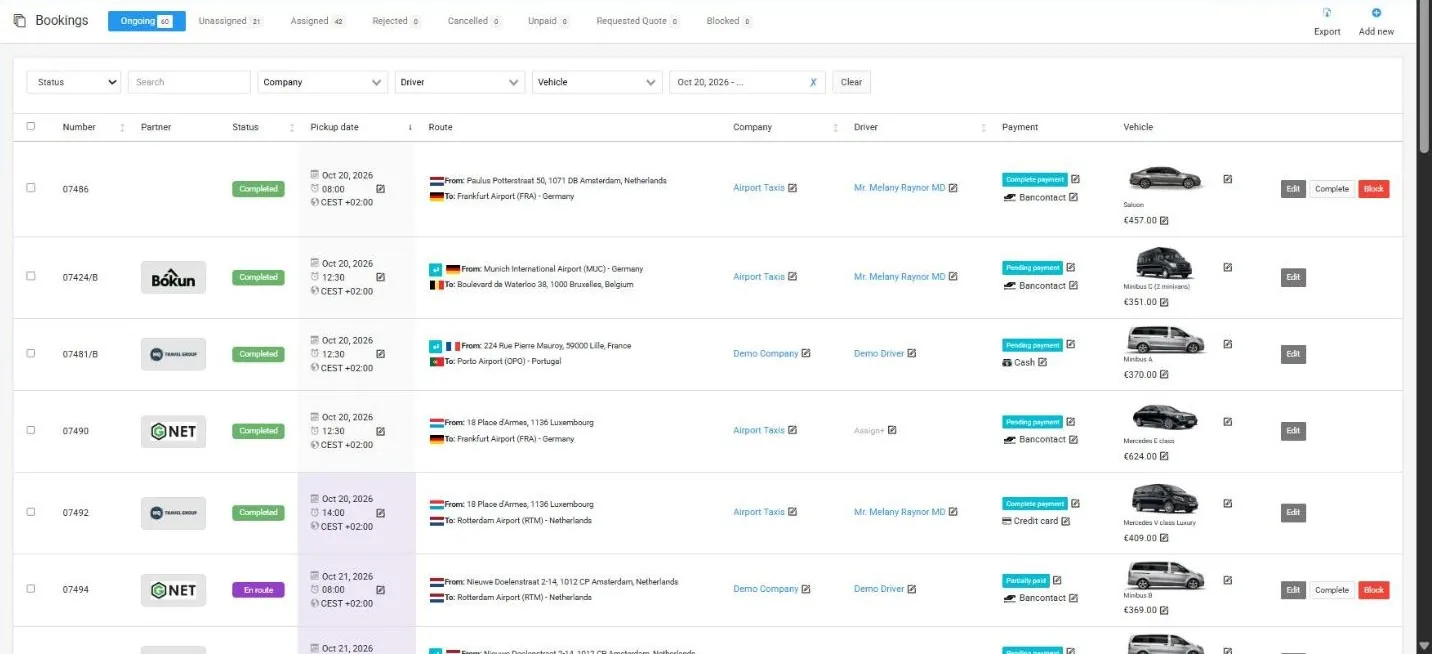
13:26a slashB appears in the booking number along with a notification indicating that you are editing the return trip. If you ever need to review what actions were taken on a specific order, use the history button in the top right corner, which shows a detailed log of all actions related to that order. All confirmed orders are automatically moved to this section. Here you can manually complete an order, block it in emergency cases, or view a detailed summary and full trip information. Orders in the list are colorcoded based on the trip start time. Gray, the trip has already started. Purple, the trip starts today.
14:14Red, the trip starts within the next 7 days. Yellow, the trip starts next week. green. The trip starts in more than two weeks. In addition, the following details are displayed for each order. Order number, trip date and time, pickup and drop off addresses, the taxi company assigned to complete the order, the driver assigned to the order, vehicle class with a photo. In the invoices section, you can manage payments and funds related to your orders. Here you can view full details, download an invoice, or if necessary, issue a refund to a client upon request.
15:03Sometimes when commission payments to partners or affiliates are made outside the system, for example, in cash, there is a need to mark the invoice as paid manually. For such cases, the system administrator has a complete button next to the invoices. It is important to note that only the admin has access to change the payment status of unpaid invoices. The user section displays all users in your system, clients, drivers, partners, and affiliates. The built-in CRM management system allows you to store detailed information about all your clients. The option to add a user manually can be especially useful in cases where a client is unable to place an order themselves due to physiological reasons, allowing you to assign an order on their behalf.
15:59In the system, partners are essentially all users by default. This term refers to users who act as referrals having access to a referral link and a QR code. Any user in the system is automatically a partner and is entitled to a commission. If a partner brings a client to you via their referral link or QR code, they will receive the specified commission from the order amount. For instance, a partner could be a bar, restaurant, or hotel with a QR code displayed at the reception desk or in rooms. They will earn their commission if their visitors place a transfer order through the link or QR code. You can set the commission manually or allow partners to choose their percentage themselves using the provided checkbox.
16:45Affiliates work a bit differently and have two options. Affiliates can be companies such as tour agencies whose employees create orders for trips for their clients using the services of your transfer company. In this case, they earn a commission by adding their percentage on top of the final trip cost. As a second example, using the deferred payments option, you can allow companies to pay by invoice once a month. This is useful if you work with a company that frequently uses your services for their employees and wants to be build monthly for all transportation services. That’s all for now. If you have any questions or ideas about the system, feel free to leave them in the comments under the video. We have also included a link to the system documentation in the description. Thank you for watching and we’ll see you in the next video.