Subscribe
You install a new plugin, hit Activate, and a second later your site goes down. Instead of your homepage, visitors get a blank white screen or half a page of raw error code. It feels awful, especially when the site is live and people are on it right now.
Here’s the reassuring part. A plugin not working in WordPress is almost never something you fix by guessing. It isn’t a lottery where you have to click the right button by luck. It’s a process: first you figure out what actually broke, then you isolate the exact cause, and only then you apply the fix. Do it in that order and most plugin failures turn out to be far less scary than the white screen makes them look.
Table of Contents:
- Quick Diagnosis: Find Your Symptom First
- Before You Start: Back Up and Set Up Staging
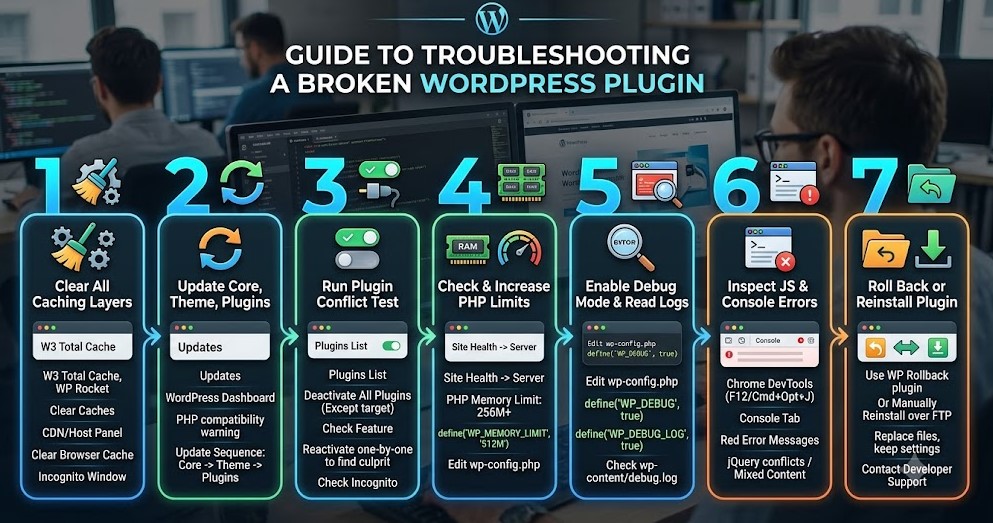
- Step 1: Clear All Caching Layers
- Step 2: Update WordPress Core, Theme, and Plugins
- Step 3: Run a Plugin Conflict Test
- Step 4: Check and Increase PHP Limits
- Step 5: Enable Debug Mode and Read the Logs
- Step 6: Inspect JavaScript and Console Errors
- Step 7: Roll Back or Reinstall the Plugin
- Common Error Codes and How to Fix Them
- How to Prevent Plugin Issues in the Future
- Frequently Asked Questions
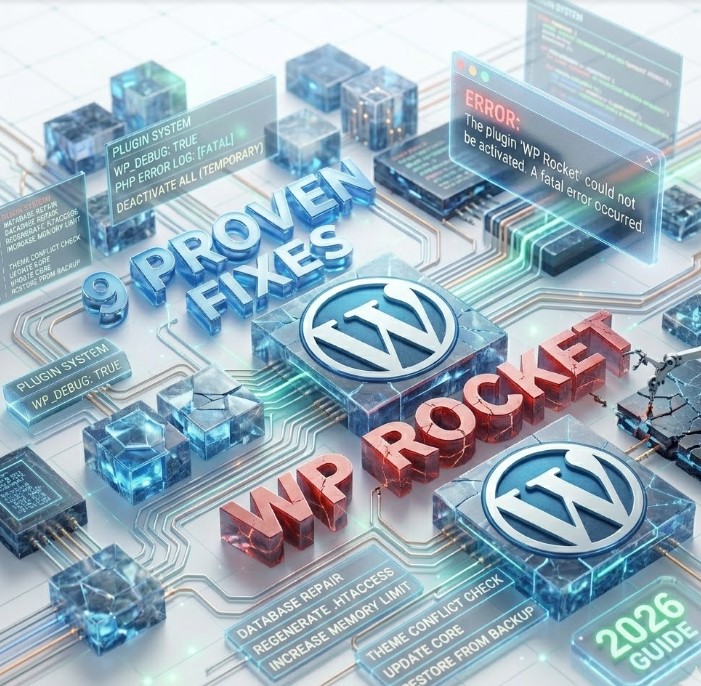
Across this guide you’ll find nine proven fixes: seven sequential steps, from quick two-minute checks to reading server logs, plus two targeted sections on specific error codes and preventing future breakage. Work through it top to bottom and you’ll get your site back online without breaking anything else.
Key Takeaways
Before we dig into the fixes, here’s the short version of what actually breaks plugins and what reliably gets them working again.
Most of the trouble in WordPress lives in plugins, not in the core software. In its 2026 State of WordPress Security report, Patchstack found that plugins accounted for 91% of every vulnerability discovered in 2025, against just two issues in WordPress core itself. So when a site breaks after an update, the plugin is almost always where you should look first.
Outdated software is the single biggest trigger. The same report logged 11,334 new vulnerabilities across the ecosystem in 2025, a 42% jump over the year before. Keeping everything current is the cheapest insurance you have against a plugin suddenly failing.
Beyond that, a few practical truths are worth keeping in mind as you work through this guide:
- Almost every failure traces back to one of three things: a plugin conflict, a caching layer serving you a stale page, or a server limit the plugin quietly hit. None of them requires editing the plugin’s actual code.
- A blank white screen nearly always means a PHP fatal error, and you don’t have to guess the culprit. Turning on WP_DEBUG writes the exact file and line to a log for you.
- You’re never truly locked out. Even if a broken plugin kills your dashboard, renaming its folder over FTP disables it and gets you back in within a minute.
- Your PHP version matters more than most people assume. WordPress.org officially recommends PHP 8.3 or higher, with 7.4 as the bare supported floor, and an outdated version alone can break a modern plugin.
Quick Diagnosis: Find Your Symptom First
Before you start changing anything, take ten seconds to match what you’re seeing to the right fix. A plugin not working in WordPress shows up in a handful of recognisable ways, and the symptom usually points straight at the cause. Jumping to the relevant step saves you from blindly toggling settings you didn’t need to touch.
Find your situation in the table below and head to the step it points to.
| What you’re seeing | Most likely cause | Where to go |
|---|---|---|
| Blank white page, no error text | PHP fatal error or hard conflict | Step 3 and Step 5 |
| Page loads, but buttons, sliders or forms do nothing | JavaScript or jQuery error | Step 6 |
| Your changes don’t show up at all | A caching layer serving an old version | Step 1 |
| Plugin worked yesterday, broke after an update | Bad update or version mismatch | Step 2 and Step 7 |
| 500 Internal Server Error | Corrupted .htaccess or memory exhaustion | Common Error Codes |
| Editor or admin page spins forever | Server limit too low | Step 4 |
| Locked out of wp-admin entirely | Fatal error on the admin side | Common Error Codes |
Before You Start: Back Up and Set Up Staging
I’ll be blunt here, because this is the step people skip and then regret. Do not troubleshoot a broken plugin on a live site that has no backup. The moment you start renaming folders, editing wp-config.php or deactivating things in bulk, you’re one wrong move away from turning a stuck plugin into a down site. Five minutes of prep now is what lets you undo any mistake instantly.
Make a full backup first
You need a clean restore point before you touch anything. If altering a core file or a database table goes sideways, a backup is your undo button.
A few reliable ways to get one:
- Use your host’s one-click backup if it has one. Most managed hosts keep automated daily snapshots you can restore from the control panel.
- Install a backup plugin like UpdraftPlus if you still have dashboard access. It pushes a complete copy of your site to Google Drive or Dropbox in a couple of minutes.
- Export the database manually through phpMyAdmin if you want an extra safety net.
- Pull your wp-content folder down over FTP, which grabs your themes, plugins and uploads in one go.
If keeping backups and updates handled properly is something you’d rather not think about every week, that’s exactly the kind of thing an ongoing WordPress care and maintenance service takes off your plate, snapshots run on a schedule so a restore point always exists before anything changes.
Work on a staging copy, not the live site
A staging site is an exact clone of your live site where you can break things safely. You reproduce the problem on the clone, figure out what’s causing it, then apply the fix you’ve proven works to the live site. Nothing your visitors see ever wobbles while you experiment.
Most managed hosts now offer one-click staging straight from the dashboard, so check there first. If yours doesn’t, the free WP Staging plugin will clone your site into a subfolder you can poke at without consequences. If you ever do end up moving the result to a different domain or host, our guide on migrating a WordPress site without losing SEO walks through doing it cleanly.
Have your FTP details ready
This part matters most when things go really wrong. If a broken plugin throws a fatal error, you can lose access to wp-admin completely, and a dashboard you can’t open is no help at all. FTP is your way in through the back door.
Before you go any further, make sure you have your FTP host address, username, password and port, and a client like FileZilla or Cyberduck installed. Connect once now and confirm it works. You do not want to be hunting for credentials in the middle of an outage.
Step 1: Clear All Caching Layers
Start here, because caching is the single most common reason a plugin looks broken when it actually isn’t. Caching saves older copies of your pages and serves them up fast, which is great for visitors and terrible for troubleshooting. You might have already fixed the problem and just be staring at a stale, cached version of the page. Before you spend an hour chasing a bug that no longer exists, clear every layer.
There’s usually more than one layer, so work through them top to bottom.
Clear your plugin and theme cache
Begin with the easiest one. If you run an optimisation plugin like WP Rocket or W3 Total Cache, look for its menu in the top admin bar and hit Purge All Caches. Some themes and page builders also keep their own cache of generated CSS, so if your theme has a regenerate or clear CSS option, run that too.
If you’re not sure which caches you even have or where they hide, our walkthrough on clearing WordPress cache when changes don’t show up covers every layer in one place.
Clear server-side and CDN caching
Your host very likely caches the site at the server level, intercepting requests before they ever reach WordPress. On top of that, if you run a CDN, there’s yet another copy of your pages living on edge servers. You’ll want to clear both:
- Log into your hosting panel, whether that’s cPanel, MyKinsta or Cloudways.
- Open the performance or caching section and flush the object cache and any Varnish cache you see there.
- If you use a CDN like Cloudflare, open its dashboard separately and run Purge Everything.
If the difference between these two layers is fuzzy, this breakdown of CDN versus caching makes it clear which one you’re actually clearing.
Bypass your own browser cache
The last cache is the one sitting on your own machine. Your browser hangs on to JavaScript and CSS aggressively, so even after everything server-side is clear, you might still be looking at old files. Open the broken page in a fresh Incognito or Private window and do a hard refresh, Ctrl+F5 on Windows or Cmd+Shift+R on Mac. That forces the browser to pull every file straight from the server.
If the plugin suddenly works in Incognito but not in your normal window, you’ve found your answer, it was never broken, just cached.
Step 2: Update WordPress Core, Theme, and Plugins
A huge share of plugin failures come down to one thing: version mismatch. Software moves fast. If your core install is a year behind but the plugin you just added was written against current standards, the two are speaking slightly different languages, and that’s where crashes come from. Getting everything onto current versions resolves a surprising number of “broken” plugins on its own.
It also closes real security holes. The overwhelming majority of WordPress vulnerabilities are found in plugins, and outdated versions are exactly where attackers look first. Updating isn’t just a fix, it’s protection.
Check for version mismatches
Before updating blindly, see what’s actually out of step. Head to Dashboard → Updates and look for anything flagged, especially warnings about PHP compatibility. WordPress.org officially recommends PHP 8.3 or higher with 7.4 as the bare minimum it still supports, so if a plugin is complaining about your PHP version, that mismatch alone can be the whole problem.
Update in the right order
You can’t just hit Update All and walk away. There’s a sequence that keeps everything structurally consistent, because each layer builds on the one below it:
- Core first. This sets the foundation that plugins and themes expect to find.
- Theme second. Your theme hooks into core, so it needs to match the updated core code.
- Plugins last. Update your most critical ones first, things like WooCommerce or your security suite, then the smaller utilities.
After each round, open the front end in an Incognito window and check that nothing broke. Updating in stages like this means that if something does go wrong, you know exactly which update caused it instead of guessing among a dozen at once.
Decide how updates should run going forward
Once you’re back to stable, it’s worth thinking about how updates happen day to day. Auto-updates keep you patched without lifting a finger, but they can also push a bad plugin release onto a live site at three in the morning with nobody watching. There’s a real trade-off between staying current and staying in control, and our guide on disabling WordPress auto-updates safely walks through how to strike that balance without leaving your site exposed.
Step 3: Run a Plugin Conflict Test
If your site is fully updated and every cache is clear but the plugin still won’t behave, you’re almost certainly looking at a conflict. Two pieces of code are fighting over the same resource, the same hook, or the same script, and one of them loses. This is the most common cause behind the dreaded white screen, and the only reliable way to find it is process of elimination.
The logic is simple: turn everything off, confirm the problem disappears, then bring things back one at a time until it reappears. The plugin that brings the problem back is your culprit.
Deactivate everything, then narrow down
The fastest way to confirm a conflict exists is to clear the field completely:
- Go to Plugins → Installed Plugins.
- Select all plugins with the master checkbox at the top.
- Uncheck only the plugin you’re trying to fix.
- Choose Deactivate from the bulk actions dropdown and apply.
Now test the feature. If the broken plugin suddenly works with everything else switched off, you’ve proven a conflict, something in that group was interfering. If it still doesn’t work even alone, the problem is the plugin itself, and you can skip ahead to Step 5 and Step 7.
Reactivate one at a time to find the culprit
Once you know a conflict exists, you have to name it. Reactivate your other plugins one by one, and after every single one, refresh the site and test the broken feature again. The moment it breaks, the plugin you just switched on is the source. It’s tedious, but it’s the only method that gives you a definite answer rather than a guess.
Pro tip from experience: never reactivate plugins in a random order when you’re hunting a conflict. Start with the ones you suspect least, the simple, well-known plugins, and leave your heavy hitters like page builders and WooCommerce for last. Conflicts almost always involve the bigger, script-heavy plugins, so saving them for the end means you’ll usually catch the culprit before you even get to them. And test in an Incognito window every time, or your own browser cache will lie to you about whether it’s fixed.
Viktor Sayenko, WordPress & web development specialist
When the culprit is a low-quality plugin
Sometimes the plugin you find isn’t one you’re attached to, it’s some abandoned utility loading bloated scripts that trip up everything around it. If that’s the case, the right move isn’t to keep nursing it. Swap it for something better maintained. Our roundup of the best WordPress plugins is a good place to find a well-coded replacement that won’t pick the same fight.
Step 4: Check and Increase PHP Limits
Sometimes a plugin isn’t broken or conflicting at all, it’s just starving. Complex plugins, page builders and ecommerce tools need server memory and processing time to do their work. If your host caps those resources too low, the plugin hits the ceiling and gives up, usually with a fatal error or a page that loads halfway and freezes. The fix here isn’t the plugin, it’s the environment around it.
Check your current limits
You don’t need server access to see what you’re working with. WordPress reports it for you:
- Go to Tools → Site Health, then open the Info tab.
- Expand the Server section.
- Note your PHP version and PHP memory limit.
If those numbers look low, that’s very likely your answer. The table below shows where they should sit in 2026.
Recommended settings for 2026
| Setting | Bare minimum | 2026 target |
|---|---|---|
| PHP version | 7.4 (end of life) | 8.3 or higher |
| Memory limit | 128M | 256M – 512M |
| Max execution time | 30 seconds | 120 – 300 seconds |
| Max input vars | 1000 | 3000 – 5000 |
A quick note on the PHP version row, since it’s the one that breaks plugins most often. WordPress.org officially recommends PHP 8.3 or higher, and 7.4 reached end of life some time ago, meaning it no longer gets security patches. Running it isn’t just a performance issue, it’s a liability, and plenty of modern plugins simply won’t run on it.
Raise the memory limit
If your memory limit is stuck at 64M or 128M, you can lift it yourself by editing wp-config.php. Connect over FTP, open the file in a plain text editor, and just before the line that reads /* That's all, stop editing! Happy publishing. */, add:
define( 'WP_MEMORY_LIMIT', '512M' );Save, upload, and recheck Site Health. If you’re comfortable being in wp-config.php but want to understand what you’re looking at before you start editing, our guide to editing core WordPress files safely is worth a read first.
One caveat: some budget shared hosts block this override at the server level, so if your limit refuses to move after editing wp-config.php, the cap is on their side and you’ll need to ask support or look at a more capable host.
Step 5: Enable Debug Mode and Read the Logs
When the quick fixes haven’t worked, stop guessing and let WordPress tell you exactly what’s wrong. A broken plugin almost always leaves a trail in the error logs, naming the precise file and line that triggered the crash. The catch is that WordPress hides these messages by default so visitors never see ugly code on a live page. You have to switch the logging on yourself.
Turn on debug logging
This is a small edit to wp-config.php, the same file you met in the last step. Connect over FTP, open it, and make two changes:
- Find the line that reads
define( 'WP_DEBUG', false );and changefalsetotrue. - Directly beneath it, add
define( 'WP_DEBUG_LOG', true );.
Save and upload the file. The official WordPress debugging documentation covers the full set of debug constants if you want to log errors quietly without displaying them on screen, which is what you’d want on anything resembling a live site.
Read the debug.log file
With logging on, go back and trigger the error again, actually use the broken feature until it fails. WordPress writes everything to a new file at wp-content/debug.log. Open it over FTP and look for lines marked PHP Fatal error or Parse error. These spell out the cause, and crucially they name the plugin folder responsible, so the guesswork is over.
The log will often point at a specific, named problem rather than a vague one. A missing PHP module is a common example, and if you see something like a MySQL extension error, our complete fix for the missing MySQL extension message walks through resolving exactly that.
Use Query Monitor if logs feel daunting
If reading raw log files isn’t your idea of a good time, install the free Query Monitor plugin instead. It adds a panel to your admin bar and surfaces the same information visually, slow database queries, broken hooks, PHP errors and memory spikes, all flagged in real time as you browse. For many people it’s a far less intimidating way to spot the plugin that’s dragging the site down.
Step 6: Inspect JavaScript and Console Errors
Not every broken plugin throws a white screen or a PHP error. Sometimes the page loads perfectly, but a button won’t click, a slider won’t move, or a form refuses to submit. When the back end looks fine but things don’t work, the failure is almost always on the front end, in the JavaScript running inside the visitor’s browser. The trouble is that these errors are invisible until you open the console and look.
Open your browser’s developer tools
Your browser knows exactly what went wrong, you just have to ask it. Right-click anywhere on the broken page and choose Inspect, or press F12, then switch to the Console tab. You’re looking for red text. Yellow lines are only warnings and you can ignore them, but red means a script hit an error and stopped executing, which is what takes your plugin’s feature down with it. If you want to dig further into which file the error is coming from, our guide on finding the source code in WordPress shows you how to trace it.
Watch for jQuery conflicts
WordPress leans heavily on a library called jQuery, and a poorly built plugin can load its own outdated copy that overwrites the version WordPress expects. When that happens, every other plugin relying on jQuery can break at once. Two error messages give it away:
- Uncaught ReferenceError: jQuery is not defined
- $ is not a function
If you see either, a rogue plugin is injecting bad scripts. Go back to the conflict test in Step 3 to find which one, then update it, replace it, or report it to its developer.
Resolve mixed content warnings
The other common console issue is mixed content. It happens when your site loads securely over HTTPS but a plugin tries to pull an image or script over plain HTTP. Modern browsers block that insecure request outright, and whatever depended on it breaks. A tool like Really Simple SSL fixes this by forcing every asset to load over HTTPS, clearing the warnings in one move.
A note on script bloat
Worth mentioning while you’re in the console: if a page is straining under a pile of scripts from too many plugins, the symptoms can look like a malfunction even when nothing is strictly broken. Trimming or deferring what loads on each page helps, and our guide on eliminating render-blocking resources covers how to get scripts under control.
Step 7: Roll Back or Reinstall the Plugin
If you’ve identified the plugin, ruled out conflicts and given it enough memory, but it still won’t behave, the files themselves may simply be corrupted. A bad update or a hiccup during installation can leave you with incomplete code that no amount of configuring will fix. At this point you have two clean options: go backward to a version that worked, or start fresh with a clean copy.
Roll back to a version that worked
If the plugin was fine yesterday and only broke after today’s update, reverting is the fastest route back to normal.
- Install and activate the free WP Rollback plugin.
- Go to your Plugins list, where you’ll now see a Rollback link beside each free plugin.
- Click it, pick the version you were running before, and confirm.
Once you’re stable again, do the developer a favour and report the bug on their support forum so they can patch it. Rolling back is a temporary safety net, not a permanent home, you don’t want to sit on an old version forever.
Reinstall manually over FTP
If you can’t reach the dashboard, or the plugin is a premium one that WP Rollback doesn’t cover, do it by hand:
- Download a fresh copy of the plugin from the developer’s site.
- Connect over FTP and open wp-content/plugins/.
- Delete the broken plugin’s folder completely. This removes only the files, not your saved settings in the database, so you won’t lose your configuration.
- Unzip the fresh download and upload the clean folder back into the plugins directory.
When it’s time to call in help
Some plugins are beyond a rollback or a reinstall. If the plugin is abandoned, the conflict is buried deep in custom code, or the feature you need just doesn’t exist in a stable form anymore, the honest answer is that patching it yourself stops being worth the time. That’s the point where bringing in professional WordPress development support to patch, rebuild or replace the broken functionality properly saves you far more than another evening of trial and error.
Common Error Codes and How to Fix Them
Plugins tend to fail in a few recognisable ways, and knowing the specific symptom saves you from digging through every settings menu. Here are the scenarios you’re most likely to run into, and what each one actually means for your site.
Fixing the 500 Internal Server Error
This is the server’s version of throwing its hands up, a generic signal that something went wrong but it can’t say what. With plugins, the cause is usually a corrupted .htaccess file or PHP memory that’s been exhausted. Work through it in this order:
- Regenerate .htaccess first, since it’s the quickest fix. Go to Settings → Permalinks and click Save Changes without altering anything. This forces WordPress to write a clean .htaccess file.
- If that doesn’t help, suspect a plugin. Rename your entire plugins folder to plugins-old over FTP. If the site comes back, a plugin triggered the 500, and you can rename it back, then isolate the culprit with the conflict test in Step 3.
If you later need to work with .htaccess deliberately, for instance adding redirects after moving content, our practical guide to 301 redirects via .htaccess covers the syntax safely.
When the editor or admin page just spins
A continuous loading spinner usually means your browser and server aren’t communicating properly, and the root cause is almost always a server limit set too low.
- Lift your memory limit first, following Step 4. Most spinner cases clear up right here.
- If a page builder editor still hangs, look in its advanced settings for an option to change how it loads its files. Many builders include a fallback loading method that bypasses restrictive server configurations and gets the editor opening again.
Getting back in when you’re locked out of the dashboard
This is the one that causes real panic. A bad plugin update throws a fatal error on the admin side, and now you can’t log in to deactivate the plugin that’s locking you out. It feels like a dead end, but it isn’t.
- Open your FTP client and go to wp-content/plugins/.
- Find the folder of the plugin you suspect and rename it, say from broken-plugin to broken-plugin-disabled.
- WordPress will look for the plugin, fail to find it, and automatically deactivate it in the database.
That instantly restores your dashboard access. Log back in, and you’re free to investigate properly from there.
How to Prevent Plugin Issues in the Future
Fixing a broken plugin is one thing. Not having to do it again is better. Most of the failures in this guide are avoidable with a few habits that cost almost nothing once they’re part of your routine.
The biggest one is testing before you commit. A large share of broken live sites come down to a single bad habit: updating or installing straight on production with no safety net. Run new plugins and updates on a staging copy first, confirm nothing breaks, then push the change live. It turns “my site is down” into “good thing I caught that on staging.”
Beyond that, a handful of small disciplines keep most problems from ever starting:
- Keep core, themes and plugins current, but apply updates deliberately rather than letting everything auto-update unattended on a live site.
- Run lean. Every plugin is more code that can conflict or break, so periodically remove ones you no longer use instead of leaving them dormant.
- Favour well-maintained plugins from active developers over abandoned ones, since a plugin untouched for a year or more is both a stability risk and a security one.
- Keep a recent backup at all times, so the worst case is a quick restore rather than a rebuild.
A lot of these come down to choices made early, when the site is first built. Our roundup of the most common mistakes to avoid when building a WordPress site is worth a look if you want to get ahead of the problems rather than react to them.
And if none of this sounds like how you want to spend your time, that’s a completely reasonable position. Staying patched, monitored and backed up is exactly what an ongoing WordPress care and maintenance service exists to handle, so the updates happen on a schedule, a restore point is always in place, and a broken plugin gets caught before it ever reaches your visitors.
Frequently Asked Questions
Why does a plugin suddenly stop working when nothing changed?
Usually something did change in the background. WordPress core or another plugin updated automatically, your host quietly bumped the PHP version, or a plugin you rarely think about pushed a release. Any of those can clash with code that was working fine an hour earlier. The conflict test in Step 3 is the fastest way to find which moving part caused it.
Can I fix a broken plugin myself?
Often, yes. Caching issues, conflicts, memory limits and bad updates are all things you can resolve with the steps above, no coding required. What you can’t safely do is rewrite the developer’s actual code if the bug lives inside the plugin itself. In that case your options are to roll back to a working version, wait for a patch, or replace the plugin.
Does deactivating a plugin delete its data?
No. Deactivating, or even deleting a plugin’s files over FTP, only removes the executable code. Your settings, shortcodes and saved content stay in your database and come back when you reinstall the plugin. This is why renaming a plugin folder to get back into a locked dashboard is safe, you’re not losing any configuration.
Will updating WordPress break my old plugins?
It can, and it’s worth being ready for. If a plugin hasn’t been updated by its developer in a long time, a major core update can remove or change functions that the old plugin depended on, and it stops working. This is exactly why testing updates on a staging copy before going live matters so much.
What is the white screen of death?
It’s the blank white page you get when PHP hits a fatal error while debugging is switched off. Rather than show the error, WordPress simply stops running and serves nothing, leaving an empty browser window. It looks alarming but it’s almost always a plugin conflict or a fatal error you can pinpoint by turning on WP_DEBUG, as in Step 5.
How much PHP memory do I actually need?
A simple blog runs fine on 128M. But modern sites using page builders, ecommerce or complex forms should treat 256M as a realistic floor, with 512M giving comfortable headroom. If you’re seeing memory-exhaustion errors, that’s your sign to raise the limit, which Step 4 covers.
How do I know if it’s my theme causing the conflict instead of a plugin?
Temporarily switch to a default theme like Twenty Twenty-Five. If the broken plugin suddenly works, the conflict was in your previous theme’s code, not the plugin. You can then decide whether to fix the theme, contact its developer, or choose a different one.
Can having too many plugins slow down or break my site?
It’s less about the raw number and more about quality. A handful of poorly built plugins that load heavy scripts on every page do far more damage than a larger set of lean, well-coded ones. That said, fewer plugins overall does mean fewer chances for conflicts, so trimming what you don’t use is always worth doing.
What should I do if the plugin’s developer has abandoned it?
If a plugin hasn’t seen an update in a year or more, treat it as a liability rather than something to keep alive. Abandoned plugins are a leading source of security vulnerabilities. Research a maintained alternative, migrate your data, and replace it before it becomes the reason your site gets compromised.