Subscribe
If you’ve already set up Google Analytics 4 on your WordPress site, you’re off to a good start. You can see how many people visit your website, where they come from, and how they interact with your pages at a basic level.
However, at some point, this data stops being enough. You might notice traffic growing, but still have no clear understanding of what actually drives results. Which buttons are users clicking? Which forms are bringing in leads? What actions actually lead to conversions?
This is where Google Tag Manager for WordPress becomes essential.
Instead of relying on limited built-in tracking or constantly modifying your site’s code, Google Tag Manager gives you a flexible way to manage how data is collected. It allows you to define specific user actions, track them accurately, and adjust your setup without needing a developer every time.
For many websites, the moment you try to install Google Tag Manager on WordPress and move beyond basic analytics is the moment tracking starts to make real business sense. You are no longer just looking at traffic, you start understanding behavior.
In this guide, we’ll walk through a complete GTM WordPress setup, from installation to practical tracking. By the end, you’ll understand how to connect Google Tag Manager with GA4 and start tracking the actions that actually matter for your website.
Why Google Analytics Alone Is Not Enough
Google Analytics 4 gives you a solid overview of what is happening on your website. You can see traffic sources, page views, user locations, and general engagement metrics. For many website owners, especially at the beginning, this feels like enough.
However, as soon as your website starts playing a role in generating leads or revenue, these insights quickly become limited.
You might see that a page gets traffic, but you don’t know which elements actually drive action. Which buttons are users clicking? Which forms generate real leads? How many users attempt to contact you but never complete the process? Even something as simple as a phone number click often goes unnoticed in standard analytics.
This is where many businesses get stuck. The data exists, but it doesn’t answer the questions that matter. You see activity, but not intent. You see traffic, but not results.
Google Analytics collects information, but it does not give you full control over what should be tracked and how. Without a more structured setup, you are only seeing part of the picture, and that makes it difficult to make decisions with confidence.
This is where Google Tag Manager for WordPress changes the situation completely. Instead of relying on default tracking, you define specific user actions such as clicks, form submissions, and key interactions, and send that data exactly where it needs to go.
This becomes especially important if you are running paid campaigns. Without proper tracking, it is almost impossible to understand which ads, pages, or actions are actually generating results, especially when working with structured campaigns like Google Ads Setup.
Read Also: How to Create Google Analytics Dashboards in WordPress
GTM vs Plugins vs Manual Code
When it comes to adding tracking to a WordPress website, most users usually follow one of three approaches. At first glance, they all seem to solve the same problem, but in practice, they work very differently, especially when your tracking needs start to grow.
Before going deeper, it helps to see the difference in a simple way:
| Method | Best For | Limitation |
|---|---|---|
| Plugins | Quick setup | Limited flexibility |
| Manual code | Full control | Risk of errors |
| GTM | Scalable tracking | Learning curve |
Plugins
Plugins are often the first choice, especially for beginners working with WordPress. They are easy to install and require almost no technical knowledge, which makes them a convenient way to get basic tracking running quickly. However, as soon as you need more advanced tracking, such as custom events or detailed user behavior, their limitations become more noticeable.
Typical advantages include:
- quick setup without coding
- beginner-friendly interface
The main limitation is reduced flexibility when your tracking requirements become more complex.
Manual Code
This approach gives you full control, but also comes with higher risk. You manually insert tracking scripts into your website files, usually in the header or footer.
It allows precise customization, but requires more attention and technical confidence. A small mistake in the wrong place can break tracking or affect how your site behaves. In addition, any future changes typically require developer involvement, which makes this approach harder to scale.
Google Tag Manager
Google Tag Manager for WordPress sits between these two approaches. It gives you flexibility without forcing you to constantly edit code or rely on multiple plugins.
Instead of modifying your site each time, you manage all tracking from a single interface. This makes it easier to scale your setup as your website grows and to adjust tracking without technical friction.
There is a learning curve at the beginning, but once the basics are clear, it becomes significantly easier to manage compared to other methods. This is especially true if you plan to run campaigns, analyze user behavior, or build a structured GTM WordPress setup.
Google Tag Manager becomes the most practical and scalable solution in the long run.
When You Should Use GTM (and When Not)
Google Tag Manager is a powerful tool, but that doesn’t mean every website actually needs it. In some cases, adding it too early only complicates things without giving real value.
The difference usually comes down to how you use your website.
If your site is just publishing content and you only care about traffic numbers, Google Analytics is often enough. You can see how many people visit, where they come from, and which pages they view. For simple setups, this level of insight is usually sufficient.
However, the situation changes the moment your website becomes part of a business process.
If you are collecting leads, running ads, or trying to understand how users move through your pages, basic analytics quickly reaches its limits. You may see that traffic exists, but you don’t clearly understand what actions users take or what actually leads to a conversion.
This is where Google Tag Manager starts to make sense.
It allows you to define specific interactions and track them properly, whether it’s a button click, a form submission, or a key step in your funnel. More importantly, it gives you the flexibility to adjust tracking without having to modify your site every time.
On the other hand, if none of this applies yet, adding GTM may be unnecessary. It introduces an extra layer that you will need to manage, and without a clear goal, it often remains underused.
In practice, GTM becomes valuable not when traffic increases, but when your questions become more specific — especially when you start connecting user actions to leads, conversions, and actual business results. This is the point where you start asking better questions about user behavior.
Read Also: Why Standard Contact Forms No Longer Work in 2026 — And What Replaces Them
How to Set Up Google Tag Manager Account
Before you can use Google Tag Manager on your WordPress site, you need to create an account and a container. This is a one-time setup and usually takes only a few minutes.
Start by visiting the official Google Tag Manager documentation and signing in with your Google account. From there, you can create a new account for your website.
You’ll be asked to enter an account name, which is typically your business or project name, and then define a container. The container represents your website, and in most cases, you’ll select “Web” as the target platform.
Once the setup is complete, Google Tag Manager will generate a code snippet. This code connects your website to the GTM interface and allows you to manage tracking without modifying your site each time.
At this stage, you’re not configuring tracking yet. You’re simply setting up the environment where all future tracking will be managed.
After that, you’ll be taken to your container dashboard. This is where tags, triggers, and variables are created and controlled as your tracking setup evolves.
How to Install Google Tag Manager on WordPress (Step-by-Step)
Once your Google Tag Manager account is ready, the next step is to connect it to your WordPress website. This is done by adding the GTM container code to your site. While it may sound technical at first, the process is quite straightforward in practice.
There are two common ways to install Google Tag Manager on WordPress, and both work well depending on how you prefer to manage your website.
Option 1: Using a Plugin
This is the simplest approach and usually the best choice if you want to avoid working with code. You install a plugin, enter your GTM container ID, and the connection is handled automatically. For most WordPress websites, this method is fast, reliable, and more than enough to get started without unnecessary risk.
Option 2: Manual Installation
This option gives you more direct control over how Google Tag Manager is added to your site. Instead of using a plugin, you insert the code manually into your theme files.
This involves adding two snippets of code:
- one inside the
<head>section - one immediately after the opening
<body>tag
These snippets are generated when you create your GTM container. While the process itself is not complicated, it does require careful placement. Even a small mistake in the wrong file can affect how your site behaves or how tracking works.
Because of this, many website owners prefer not to modify theme files directly. If you want to avoid technical risks or ensure everything is set up correctly from the start, it can be handled through structured support like Website Maintenance, where both setup and long-term stability are managed properly.
At this stage, the goal is simple. You are not configuring tracking yet. You are only making sure that your website is correctly connected to Google Tag Manager. Once this connection is in place, all further tracking can be managed from the GTM interface.
How GTM Structure Should Look
Once Google Tag Manager is installed, the next step is not just adding tags, but organizing your tracking setup properly. This is where many implementations start to fall apart. Without a clear structure, even a simple setup quickly becomes difficult to manage.
A well-organized GTM account follows a predictable logic. Each part of the system has a specific role, and together they create a consistent tracking flow.
At a basic level, your structure should look like this:
- one GA4 Configuration tag that runs on all pages
- separate event tags for each important interaction
- clearly defined triggers that control when tags fire
- variables that pass useful data into your events
The GA4 configuration tag acts as the foundation. It loads Google Analytics across your website and ensures that all events are connected to the same property. This tag should only be set up once and applied globally.
Event tags are where the actual tracking happens. Each important action, such as a form submission, button click, or phone interaction, should have its own event tag. This keeps your tracking clean and easy to expand later.
Triggers define when something should happen. A well-structured setup avoids overly broad triggers and instead focuses on precise conditions. This reduces errors and prevents unnecessary data from being collected.
Variables add context. They allow you to pass additional information, such as page URLs, button text, or user actions, into your events. This becomes especially useful when you want to analyze behavior in more detail.
The key idea is consistency. Instead of creating tags randomly, you build a system where every element has a clear role and follows the same logic. This makes your setup easier to maintain, debug, and scale over time.
Without this structure, tracking often becomes unreliable. Data may still be collected, but it becomes harder to trust and even harder to use for decision-making.
Most GTM setups look correct on the surface, but often contain hidden issues that break tracking and distort data.
If you’re not fully confident that your setup is accurate, reviewing it properly before relying on the data can prevent costly mistakes.
How to Name Tags, Triggers, and Events Properly
Once your GTM structure is in place, the next step is making sure everything is named correctly. This may seem like a small detail at the beginning, but in practice, naming is one of the most important parts of a scalable tracking setup.
Without a clear naming system, your container quickly becomes difficult to manage. After a few weeks or months, it becomes hard to understand what each tag does, which triggers are connected, and how events are structured. This is where most setups start to break down.
A good naming convention keeps everything readable, predictable, and easy to maintain.
At a basic level, each element in GTM should clearly describe its purpose:
- what type of tag it is
- what action it tracks
- when it fires
For example, instead of generic names like:
- “Tag 1”
- “Click Event”
you should use structured names such as:
GA4 - Config - All PagesGA4 - Event - form_submitGA4 - Event - button_clickClick - contact_button
This type of naming makes it immediately clear what each element does, even if you return to the project months later.
Consistency is more important than complexity. You don’t need a perfect system from the start, but you do need a consistent pattern that you follow across all tags, triggers, and variables.
A simple approach that works well in most cases:
- use a prefix to define the type (
GA4,Click,Form, etc.) - describe the action (
submit,click,view) - add context if needed (
contact_form,pricing_page)
Over time, this makes your tracking setup much easier to scale. You can quickly find, edit, or debug specific elements without confusion.
In real-world projects, poor naming is one of the main reasons tracking becomes unreliable. Not because the setup is technically wrong, but because no one can clearly understand or maintain it anymore.
A well-structured naming system doesn’t just keep things organized, it directly affects how efficiently your tracking can be managed and improved.
Read Also: SEO Optimization: How to Rank Your Business on Google
Connecting Google Analytics 4 via GTM
Once Google Tag Manager is installed on your WordPress site, the next step is to connect it with Google Analytics 4. This is where your tracking setup starts to become more structured and easier to control.
Instead of adding the GA4 tracking code directly to your website, you manage everything through GTM. This approach gives you more flexibility, especially when you need to update tracking later or add new events without modifying your site again.
The idea behind the setup is straightforward. You create a tag inside Google Tag Manager that sends data to Google Analytics, and then define when that tag should be activated.
In most cases, this starts with a basic configuration tag that loads GA4 on every page. The setup inside GTM typically follows a simple sequence:
- create a new tag in GTM
- choose “Google Analytics: GA4 Configuration”
- enter your Measurement ID
- set the trigger to “All Pages”
This ensures that Google Analytics is active across your entire website and begins collecting data consistently.
If you’re not sure where to find your Measurement ID or how your GA4 property is structured, it’s worth reviewing the initial setup first:
→ How to Set Up Google Analytics 4 on WordPress
Once the tag is created, it’s important to publish your changes. Until you do that, the configuration remains in draft mode and no data is sent to Google Analytics.
After publishing, your website and Google Analytics are connected through Google Tag Manager. From that point on, every visit follows a simple flow:
User visits page → GTM loads → GA4 tag fires → data is sent to Analytics
This connection becomes the foundation for everything that follows. Once GA4 is running through GTM, you can start building more precise tracking, including clicks, forms, and conversion events.
How to Test GTM Setup (Preview Mode Explained)
After setting up Google Tag Manager and connecting it with Google Analytics, the next step is to make sure everything is actually working. This is where many beginners make mistakes, assuming that tracking is active without properly verifying it.
Google Tag Manager includes a built-in Preview Mode that allows you to test your setup before relying on the data. To start, open your GTM dashboard, click the “Preview” button, and enter your website URL. Your site will then open in a new tab along with a debugging panel that shows what is happening in real time. Every page load and user interaction is recorded, and you can clearly see which tags are triggered.
What you need to check is relatively straightforward. When your page loads, your GA4 tag should fire correctly. If it does not appear in the preview panel, something in your setup is missing or incorrectly configured. The same applies to interactions. When you click a button or submit a form, the corresponding event should be visible. If nothing happens, it usually means that the trigger or tag is not set up correctly.
To understand the logic behind this process, it helps to think of it as a simple sequence:
- user opens a page
- GTM loads
- a trigger is activated
- a tag fires
- data is sent to Google Analytics
If any step in this sequence fails, the data will not be collected as expected. This is why Preview Mode is essential. It allows you to catch issues early and fix them before they affect your analytics.
Once everything is working correctly, you can publish your changes and be confident that your tracking setup is functioning as intended.
Advanced GTM Mistakes That Break Tracking
Once your setup is in place and basic testing is done, it’s easy to assume that everything is working correctly. In reality, many tracking issues appear later and are often caused by structural mistakes that are not obvious at first.
These are not beginner errors, but problems that affect even relatively advanced setups.
One of the most common issues is incorrect firing order. In some cases, tags depend on other tags being triggered first. If the sequence is wrong, data may be sent too early, too late, or not at all. This is especially important when working with GA4 configuration tags and event tags that rely on them.
Another problem comes from tag sequencing. When multiple tags are triggered on the same event, they may interfere with each other if not properly structured. Without clear sequencing, some events may fail silently, which makes debugging much more difficult.
Duplicate tracking is also a serious issue, especially in larger projects. This often happens when tracking is implemented both directly on the website and through GTM, or when multiple containers are used without proper coordination. As a result, events are sent multiple times, leading to inflated and unreliable data.
Trigger conflicts are another hidden problem. If triggers are too broad, multiple tags may fire when only one should. If they are too restrictive, important events may never be triggered. In both cases, the data becomes inconsistent and difficult to interpret.
Consent and privacy configurations can also break tracking if not handled correctly. When consent mode or cookie restrictions are active, tags may be blocked or partially executed. If this is not accounted for in your setup, you may lose data without realizing it.
Finally, poorly structured event parameters often go unnoticed. Events may be triggered correctly, but without consistent naming or useful parameters, the data becomes difficult to analyze later. This reduces the overall value of your tracking, even if everything technically “works”.
In practice, these issues don’t always stop tracking completely, but they significantly reduce data quality. And once data becomes unreliable, any decisions based on it become less effective.
This is why a structured approach is critical. Proper naming, clear trigger logic, and consistent setup are not just technical details, they directly impact how useful your analytics really is.
Read Also: WordPress Marketing Tools: How to Grow Traffic, Leads, and Sales
Why GTM Tracking Might Not Work on WordPress
Even when everything seems to be set up correctly, GTM tracking doesn’t always work as expected. In many cases, the issue is not obvious and only becomes visible when you start checking your data more closely.
There are several common reasons why tracking may fail on a WordPress website.
One of the most frequent issues is that the GTM container is not installed correctly. If the code is missing or placed in the wrong location, tags will never fire, even if everything inside GTM is configured properly.
Another common problem is unpublished changes. You may have created tags and triggers, tested them in Preview Mode, but forgot to publish the container. In this case, nothing is actually live.
Trigger configuration is also a major source of issues. If conditions are too broad, tags may fire incorrectly. If they are too narrow, they may never fire at all. This often leads to missing or inconsistent data.
Conflicts between different tracking methods can also break your setup. For example, if Google Analytics is installed both directly on the site and through GTM, it can result in duplicated or distorted data.
In some cases, browser settings or consent restrictions may block tracking scripts. If cookie consent or privacy settings are not configured correctly, tags may not fire or may only work partially.
Finally, incorrect event configuration can make tracking appear broken. Tags may fire, but if events are not structured properly or missing parameters, the data may not appear correctly in Google Analytics.
If tracking doesn’t work as expected, the best approach is to go step by step: check installation, verify triggers, review tag configuration, and test using Preview Mode.
Real Example: Tracking a Button Click
To understand how Google Tag Manager works in practice, it helps to look at a simple real example. One of the most common use cases is tracking a button click, especially if that button is important for conversions, such as a “Contact Us” or “Get a Quote” action.
Instead of guessing whether users interact with that button, you can track every click and send that data directly to Google Analytics.
The setup follows a clear logic. First, you define what action you want to track. In this case, it’s a button click. Then, you tell GTM how to recognize that action and what should happen when it occurs.
In practical terms, the process looks like this:
- identify the button you want to track
- create a trigger that detects clicks on that element
- create a tag that sends the event to Google Analytics
- test everything using Preview Mode
- publish the changes once it works correctly
Inside GTM, this means creating a trigger of type “Click” and defining conditions that match your button. This can be based on a class, ID, or URL, depending on how your website is structured.
After that, you create a tag, usually a GA4 Event tag, where you define the event name and connect it to your Google Analytics configuration.
The logic behind this setup can be simplified into a flow:
User clicks button → Trigger detects click → Tag fires → Event is sent to GA4
Once this is configured, every interaction with that button becomes visible in your analytics. Over time, this allows you to see which pages generate engagement, which calls to action perform better, and where users drop off.
This is the point where tracking starts to support real decisions. You are no longer just looking at traffic, you begin to understand behavior.
What You Can Track with GTM (Real Business Use Cases)
Once Google Tag Manager is properly set up, the real value comes from what you choose to track. This is the point where analytics stops being abstract and starts reflecting actual user behavior.
Instead of relying on general metrics like page views or sessions, you begin to see specific actions that indicate intent. These actions are often directly connected to leads, conversions, or engagement.
For most WordPress websites, tracking usually starts with a few key interactions:
- form submissions, such as contact or quote requests
- button clicks on important calls to action
- phone number clicks for direct contact
- scroll depth and page interaction
- key steps in a booking or checkout process
Each of these actions gives you a clearer picture of how users interact with your website. You can see which pages generate engagement, where users take action, and where they drop off.
For more advanced setups, these interactions can be structured into a broader system. Instead of tracking isolated events, you begin to define what actually counts as a meaningful result. This is where approaches like AI Integration become relevant, helping analyze patterns and identify which actions lead to real outcomes.
If your goal is to move beyond basic tracking and understand what truly drives results, these types of interactions should be your starting point. They form the foundation for building a clear and measurable conversion strategy.
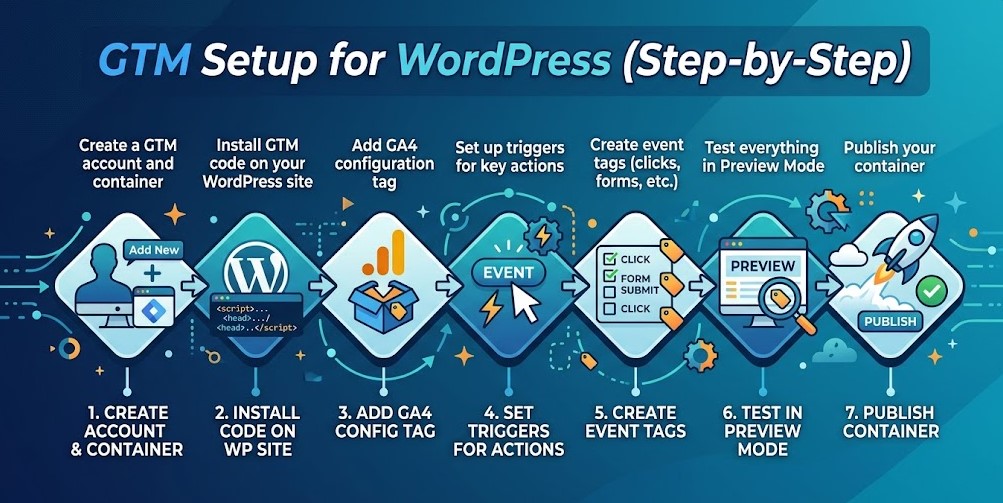
Quick Checklist: GTM Setup for WordPress
If you want a quick overview of the entire process, here is a simplified checklist that covers the essential steps for setting up Google Tag Manager on WordPress:
- create a GTM account and container
- install the GTM code on your WordPress site
- add a GA4 configuration tag
- set triggers for key actions (clicks, forms, etc.)
- test everything using Preview Mode
- publish your container
This checklist doesn’t replace a full setup, but it helps ensure that the core elements are in place. If one of these steps is missing, your tracking will either be incomplete or unreliable.
Common GTM Mistakes Beginners Make
Google Tag Manager offers a high level of flexibility, but that same flexibility often leads to mistakes, especially for beginners who are still getting used to how tracking logic works. In most cases, the issue is not technical complexity, but a lack of structure and understanding of how different elements interact.
One of the most common problems is duplicate tracking. This typically happens when Google Analytics is installed both directly on the website and through GTM at the same time. As a result, data is sent twice, which leads to inflated numbers and unreliable reports. Without realizing it, users may start making decisions based on incorrect data.
Another frequent issue is forgetting to publish changes. In Google Tag Manager, all configurations remain in draft mode until they are explicitly published. It is quite common to set up tags and triggers, test them in preview mode, and assume everything is working, while in reality no data is being collected.
Incorrect trigger configuration is also a major source of problems. A tag may be set up correctly, but if the trigger conditions are too broad, it will fire more often than intended. If they are too narrow, it may not fire at all. In both cases, the data becomes incomplete or misleading, which affects any further analysis.
Testing is another area that is often underestimated. Even though GTM provides Preview Mode, it is sometimes skipped or used only briefly. Without proper testing across different pages and interactions, small issues remain unnoticed and gradually affect the quality of collected data.
Finally, many setups lack internal structure. Tags and triggers are created without a clear naming convention or logical organization, which makes the account difficult to manage over time. As the number of tracked events grows, this quickly turns into confusion and increases the risk of errors.
In practice, most of these issues can be avoided by following a structured approach. Clear naming, consistent testing, and avoiding duplicate implementations are simple steps that significantly improve the reliability of your tracking setup.
How dataLayer Works in Google Tag Manager
To fully understand how Google Tag Manager works, it’s important to know what the dataLayer is and why it matters.
At a basic level, the dataLayer is a structured way for your website to send information to Google Tag Manager. Instead of relying only on clicks or page views, it allows you to pass specific data about user actions, events, or page details.
In simple terms, it acts as a bridge between your website and your tracking setup.
The flow looks like this:
Website action → dataLayer → GTM → Tag → Google Analytics
This becomes especially useful when you need more precise tracking. For example, instead of just detecting that a button was clicked, you can pass additional information such as:
- which button was clicked
- which page it happened on
- what type of action it represents
In practice, this allows you to build cleaner and more reliable tracking setups. Instead of guessing based on classes or page elements, you work with clearly defined data.
For basic setups, such as tracking simple clicks, you may not need to use the dataLayer directly. However, as your tracking becomes more advanced, especially for forms, eCommerce, or custom events, it becomes an essential part of your setup.
The main advantage is consistency. When data is structured properly, it becomes much easier to manage events, avoid errors, and maintain your tracking over time.
What Comes Next: Conversion Tracking Setup
At this point, your setup is already in a strong position. Google Tag Manager is installed, Google Analytics is connected, and basic tracking is working as expected. You are now collecting data in a structured way and have full control over how it is managed.
However, there is still one important step missing.
Tracking clicks and interactions is useful, but on its own it does not tell you what actually matters for your business. Not every action has the same value, and without clearly defined outcomes, it becomes difficult to measure performance in a meaningful way.
This is where conversion tracking comes in.
Instead of treating all interactions equally, you begin to define which actions represent real results. This could be a completed contact form, a booking request, a phone call, or any other action that directly contributes to your business goals. Once these actions are clearly defined, they can be tracked as conversions and used to evaluate performance more accurately.
Google Tag Manager plays a central role in this process. It allows you to configure these events in a structured way and send them to Google Analytics, where they can be analyzed and used for decision-making. Over time, this creates a clearer picture of what actually drives leads, conversions, and measurable outcomes.
If you want to move from general tracking to real performance insights, the next step is to focus on conversion tracking in WordPress. This is where your analytics setup starts to support business decisions, rather than simply reporting activity.
Final Note
A well-structured tracking setup doesn’t just collect data — it shows what actually drives leads, conversions, and real business results.
Many WordPress websites have Google Tag Manager installed, but still miss critical data due to small configuration issues, inconsistent event structure, or incomplete tracking logic.
As a result, decisions are often based on incomplete or misleading data.
If you’re not fully confident that your current setup is accurate, reviewing and structuring your tracking properly can significantly improve how you measure and optimize performance.
A reliable tracking setup is not just a technical implementation — it’s a system that directly impacts how your business grows and how effectively you turn traffic into results.
FAQ
Do I need coding knowledge to use Google Tag Manager on WordPress?
No, in most cases you don’t need advanced coding skills. Google Tag Manager is designed to let you manage tracking without constantly editing your website’s code. A basic GTM WordPress setup can be completed using plugins or simple configuration steps, while more advanced tracking can still be handled without deep development knowledge.
Is Google Tag Manager free to use?
Yes, Google Tag Manager is completely free. It is part of Google’s ecosystem and can be used on any website, including WordPress, without additional cost.
Can Google Tag Manager slow down my website?
When implemented correctly, Google Tag Manager does not significantly affect performance. In many cases, it can actually improve efficiency by reducing the need for multiple plugins and scripts running separately.
What is the difference between Google Analytics and Google Tag Manager?
Google Analytics collects and reports data about your website, while Google Tag Manager controls how that data is collected. In simple terms, GA4 shows you what is happening, and GTM helps you define what should be tracked and how events are structured.
Should I use Google Tag Manager or a plugin for WordPress tracking?
For basic tracking, plugins can be enough. However, if you need more control, flexibility, and scalability, Google Tag Manager is usually the better choice. It allows you to manage tracking in one place and adjust your setup without relying on multiple plugins.
What is dataLayer in Google Tag Manager?
The dataLayer is a structured way to pass information from your website to Google Tag Manager. It allows you to send detailed data about user actions, making your tracking more accurate and easier to manage, especially in advanced setups.
Can I use Google Tag Manager with WooCommerce?
Yes, Google Tag Manager works well with WooCommerce. It allows you to track product views, add-to-cart actions, checkout steps, and other key interactions that are essential for understanding how users move through your store.
When should I start using conversion tracking?
As soon as your website has a clear goal, such as generating leads or sales, conversion tracking becomes essential. It allows you to measure which actions actually contribute to results and helps you optimize your website and marketing efforts over time.